# 1.生命周期,钩子函数
选自: 理解 vue 实例的生命周期和钩子函数 (opens new window) vue 生命周期钩子函数的正确使用方式 (opens new window) Vue 生命周期及业务场景使用 (opens new window) vue 生命周期钩子函数(详解及使用场景) (opens new window)
# 一、vue 实例的生命周期
具体使用例子写在前: 重点掌握: created、mounted、updated、watch
beforeCreate (使用频率低):实例创建前:这个阶段实例的 data、methods 是读不到的
==整个页面创建之前==
created(使用频率高) 实例创建后:这个阶段已经完成了数据观测(data observer),属性和方法的运算, watch/event 事件回调。mount 挂载阶段还没开始,$el 属性目前不可见,数据并没有在 DOM 元素上进行渲染
- 能拿到数据
- 能修改数据,且修改数据不会触发 updated beforeUpdate 钩子函数
- 可以在这个钩子函数里发请求,访问后端接口拿数据
- 判断是否存在 el,是否存在 template,如果二者都有,以 template 为主优先, 如果 没有 template,会选择 el 模板。 如果二者都没有,有$mount 也可以调用模板
beforeMount:在挂载开始之前被调用:相关的 render 函数首次被调用。
- 真实的 dom 节点挂载到页面之前
- 编译模板已经结束,虚拟 dom已经存在,
- 可以访问数据,也可以更改数据,且修改数据不会触发 updated beforeUpdate 钩子函数
- 在 beforeMount 和 mounted 之间隐藏了一个 render 函数,千万不能写,会覆盖系统函数
mounted:el 选项的 DOM 节点 被新创建的vm.$el替换,并挂载到实例上去之后调用此生命周期函数。此时实例的数据在 DOM 节点上进行渲染
- 真实的 dom 节点挂载到页面以后
- this.$refs 找到 ref 表示的节点 >
>
可以访问和更改数据,且修改数据会触发 updated beforeUpdate 钩子函数
beforeUpdate:数据更新时调用,但不进行 DOM 重新渲染,在数据更新时 DOM 没渲染前可以在这个生命函数里进行状态处理
updated:这个状态下数据更新并且 DOM 重新渲染,当这个生命周期函数被调用时,组件 DOM 已经更新,所以你现在可以执行依赖于 DOM 的操作。当实例每次进行数据更新时 updated 都会执行
- 修改之后调用
- beforeUpdate 、updated 可以监控 data 里的所有数据变化
- 不要在 update beforeUpdate 修改不定数据,否则会引起死循环
- 监听 data 里的所有的数据,非 updated 莫属
beforeDestory:实例销毁之前调用。
- 实例卸载以前调用,可以清理非 vue 资源,防止内存泄露
destroyed:Vue 实例销毁后调用。调用后,Vue 实例指示的所有东西都会解绑定,所有的事件监听器会被移除,所有的子实例也会被销毁。
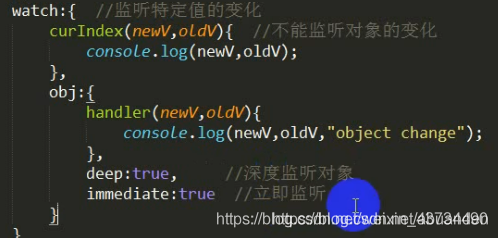
watch: 监听特定值的变化,监听路由参数的变化,用函数的形式不能监听对象的变化(与 updated 对立)
# vue 生命周期在真实场景下的业务应用
created:进行 ajax 请求异步数据的获取、初始化数据 mounted:挂载元素内 dom 节点的获取 nextTick:针对单一事件更新数据后立即操作 dom updated:任何数据的更新,如果要做统一的业务逻辑处理 watch:监听具体数据变化,并做相应的处理
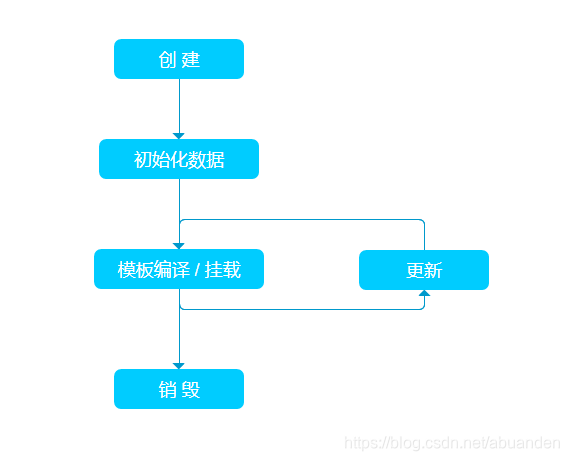
生命周期:
# 二、 结合生命周期理解钩子函数
时间线:create => mounted => updated => destory
vue2.0 提供了一系列钩子函数,这些函数和生命周期的各个阶段一一对应:
也可以这么看:
结合代码:
<!DOCTYPE html>
<html>
	<head>
		<title>钩子函数</title>
		<meta charset="utf-8" />
		<script src="http://cdn.bootcss.com/vue/2.1.10/vue.js"></script>
		<body></body>
	</head>
</html>

  <div id="app">
      <p>{{ message }}</p>
      <input type="button" @click="change" value="更新数据" />
      <input type="button" @click="destroy" value="销毁" />
  </div>

  <script type="text/javascript">
      var vm = new Vue({
          el: '#app',
          data: {
              message : "Welcome Vue"
          },
          methods:{
              change() {
                  this.message = 'Datura is me';
              },
              destroy() {
                  vm.$destroy();
              }
          },
          beforeCreate: function () {
              console.group('beforeCreate 创建前状态===============》');
              console.log("%c%s", "color:red","el     : " + this.$el); //undefined
              console.log("%c%s", "color:red","data   : " + this.$data); //undefined
              console.log("%c%s", "color:red","message: " + this.message);//undefined
          },
          created: function () {
              console.group('created 创建完毕状态===============》');
              console.log("%c%s", "color:red","el     : " + this.$el); //undefined
              console.log("%c%s", "color:green","data   : " + this.$data); //[object Object]  =>  已被初始化
              console.log("%c%s", "color:green","message: " + this.message); //Welcome Vue  =>  已被初始化
          },
          beforeMount: function () {
              console.group('beforeMount 挂载前状态===============》');
              console.log("%c%s", "color:green","el     : " + (this.$el)); //已被初始化
              console.log(this.$el); // 当前挂在的元素
              console.log("%c%s", "color:green","data   : " + this.$data); //已被初始化
              console.log("%c%s", "color:green","message: " + this.message); //已被初始化
          },
          mounted: function () {
              console.group('mounted 挂载结束状态===============》');
              console.log("%c%s", "color:green","el     : " + this.$el); //已被初始化
              console.log(this.$el);
              console.log("%c%s", "color:green","data   : " + this.$data); //已被初始化
              console.log("%c%s", "color:green","message: " + this.message); //已被初始化
          },
          beforeUpdate: function () {
              alert("更新前状态");
              console.group('beforeUpdate 更新前状态===============》'); //这里指的是页面渲染新数据之前
              console.log("%c%s", "color:green","el     : " + this.$el);
              console.log(this.$el);
              console.log("%c%s", "color:green","data   : " + this.$data);
              console.log("%c%s", "color:green","message: " + this.message);
              alert("更新前状态2");
          },
          updated: function () {
              console.group('updated 更新完成状态===============》');
              console.log("%c%s", "color:green","el     : " + this.$el);
              console.log(this.$el);
              console.log("%c%s", "color:green","data   : " + this.$data);
              console.log("%c%s", "color:green","message: " + this.message);
          },
          beforeDestroy: function () {
              console.group('beforeDestroy 销毁前状态===============》');
              console.log("%c%s", "color:red","el     : " + this.$el);
              console.log(this.$el);
              console.log("%c%s", "color:red","data   : " + this.$data);
              console.log("%c%s", "color:red","message: " + this.message);
          },
          destroyed: function () {
              console.group('destroyed 销毁完成状态===============》');
              console.log("%c%s", "color:red","el     : " + this.$el);
              console.log(this.$el);
              console.log("%c%s", "color:red","data   : " + this.$data);
              console.log("%c%s", "color:red","message: " + this.message)
          }
      })
  </script>
  </body>
  </html>
2
3
4
5
6
7
8
9
10
11
12
13
14
15
16
17
18
19
20
21
22
23
24
25
26
27
28
29
30
31
32
33
34
35
36
37
38
39
40
41
42
43
44
45
46
47
48
49
50
51
52
53
54
55
56
57
58
59
60
61
62
63
64
65
66
67
68
69
70
71
72
73
74
75
76
77
78
79
80
81
82
83
84
85
86
87
88
89
90
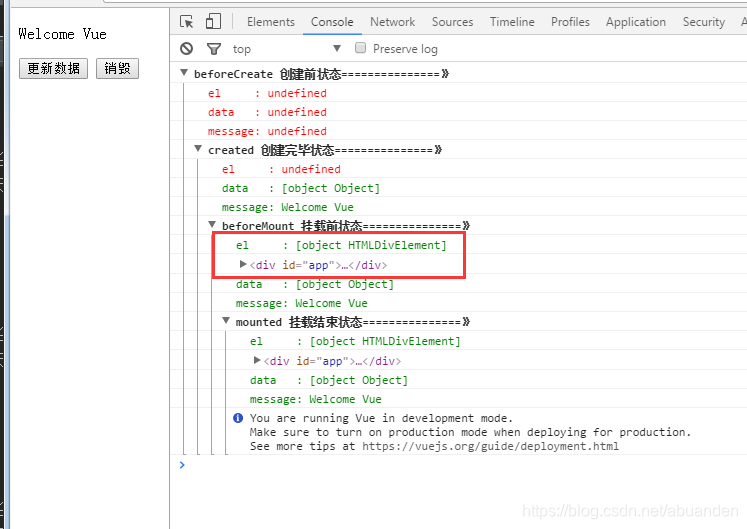
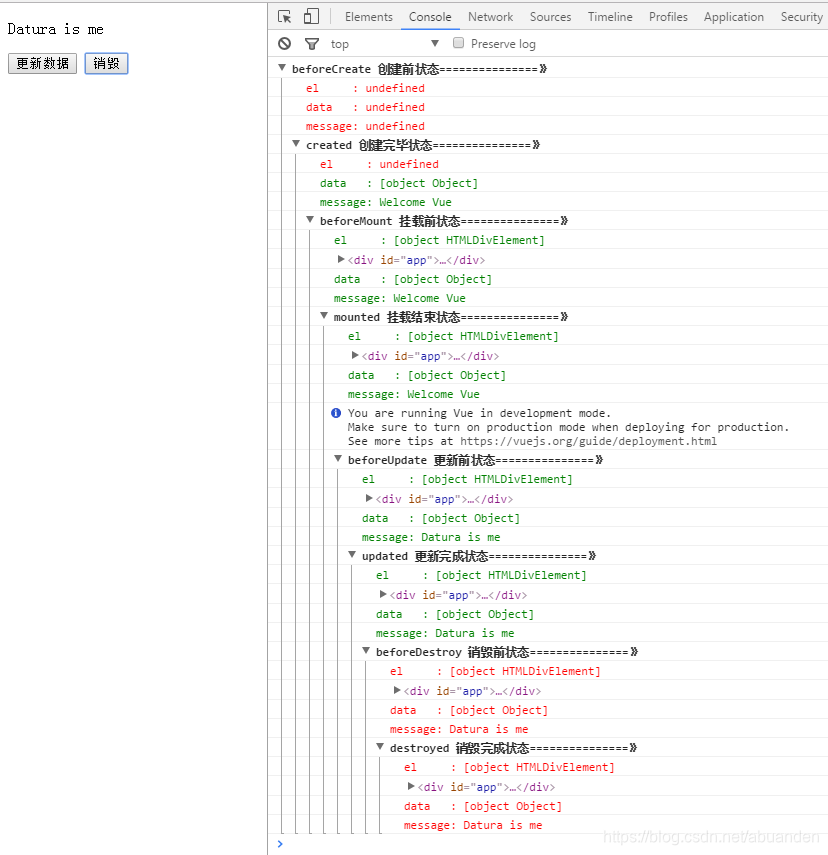
# 1. create 和 mounted
beforecreated:el 和 data 并未初始化
created:完成了data 数据的初始化,el 没有
beforeMount:完成了 el 和 data 初始化(通过虚拟 DOM 技术)
mounted:完成挂载
另外在标红处,我们能发现 el 还是 ,这里就是应用的 Virtual DOM(虚拟 Dom)技术,先把坑占住了。到后面 mounted 挂载的时候再把值渲染进去。
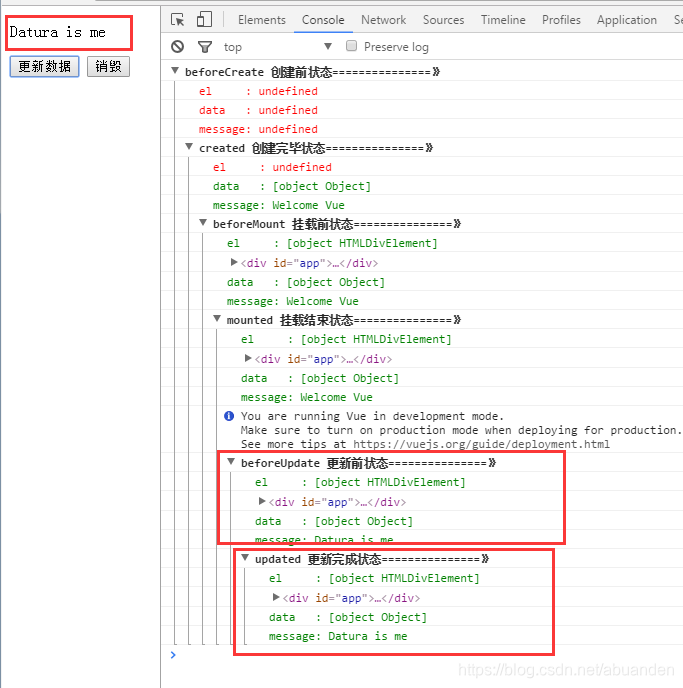
# 2. update
我们单击页面中的“更新数据”按钮,将数据更新。下面就能看到 data 里的值被修改后,将会触发 update 的操作。
ps:注意beforeUpdate 是指 view 层的数据变化前,不是 data 中的数据改变前触发。因为Vue 是数据驱动的。注意观察弹窗就容易发现。
# 3. destroy
销毁完成后,我们再重新改变 message 的值,vue 不再对此动作进行响应了。但是原先生成的 dom 元素还存在,可以这么理解,执行了 destroy 操作,后续就不再受 vue 控制了。因为这个 Vue 实例已经不存在了。
我们单击页面中的“销毁”按钮,将指定的 Vue 实例销毁。
# 三、生命周期总结
- beforecreate : 举个栗子:可以在这加个 loading 事件
- created :在这结束 loading,还做一些初始化,实现函数自执行
- mounted : 在这发起后端请求,拿回数据,配合路由钩子做一些事情
- beforeDestory: 你确认删除 XX 吗? destoryed :当前组件已被删除,清空相关内容
beforeCreate:在实例初始化之后,数据观测(data observer) 和 event/watcher 事件配置 之前被调用,注意是 之前,此时data、watcher、methods 统统滴没有。 这个时候的 vue 实例还什么都没有,但是$route 对象是存在的,可以根据路由信息进行重定向之类的操作。
created:在实例已经创建完成之后被调用。在这一步,实例已完成以下配置:数据观测(data observer) ,属性和方法的运算, watch/event 事件回调。然而,挂载阶段还没开始,
$el属性目前不可见。 此时this.$data可以访问,watcher、events、methods 也出现了,若根据后台接口动态改变 data 和 methods 的场景下,可以使用。beforeMount:在挂载开始之前被调用,相关的 render 函数 首次被调用。但是 render 正在执行中,此时DOM 还是无法操作的。我打印了此时的 vue 实例对象,相比于 created 生命周期,此时只是多了一个
$el的属性,然而其值为 undefined。(虚拟 DOM 技术) 使用场景我上文已经提到了,页面渲染时所需要的数据,应尽量在这之前完成赋值。mounted:在挂载之后被调用。在这一步 创建
vm.$el并替换 el,并挂载到实例上。(官方文档中的 “如果 root 实例挂载了一个文档内元素,当 mounted 被调用时 vm.$el 也在文档内” 这句话存疑) 此时元素已经渲染完成了,依赖于 DOM 的代码就放在这里吧~比如监听 DOM 事件。beforeUpdate:
$vm.data更新之后,虚拟 DOM 重新渲染 和打补丁之前被调用。 你可以在这个钩子中进一步地修改$vm.data,这不会触发附加的重渲染过程。updated:虚拟 DOM 重新渲染 和打补丁之后被调用。 当这个钩子被调用时,组件 DOM 的 data 已经更新,所以你现在可以执行依赖于 DOM 的操作。但是不要在此时修改 data,否则会继续触发 beforeUpdate、updated 这两个生命周期,进入死循环!
beforeDestroy:实例被销毁之前调用。在这一步,实例仍然完全可用。 实例要被销毁了,赶在被销毁之前搞点事情吧哈哈~
destroyed:Vue 实例销毁后调用。此时,Vue 实例指示的所有东西已经解绑定,所有的事件监听器都已经被移除,所有的子实例也已经被销毁。(DOM 结构还在) 这时候能做的事情已经不多了,只能加点儿提示 toast 之类的东西吧。
### 父子组件的生命周期

#### 渲染加载过程

- 父组件(beforeCreate)
- 父组件(created)
- 父组件(beforeMount)

---

- 子组件(beforeCreate)
- 子组件(created)
- 子组件(beforeMount)
- 子组件(mounted)

---

- 父组件(mounted)

#### 更新过程

- 父组件(beforeUpdate)
- 子组件(beforeUpdate)

---

- 子组件(updated)
- 父组件(updated)

#### 销毁过程

- 父组件(beforeDestroy)
- 子组件(beforeDestroy)

---

- 子组件(destroyed)
- 父组件(destroyed)
2
3
4
5
6
7
8
9
10
11
12
13
14
15
16
17
18
19
20
21
22
23
24
25
26
27
28
29
30
31
32
33
34
35
36
37
38
39